

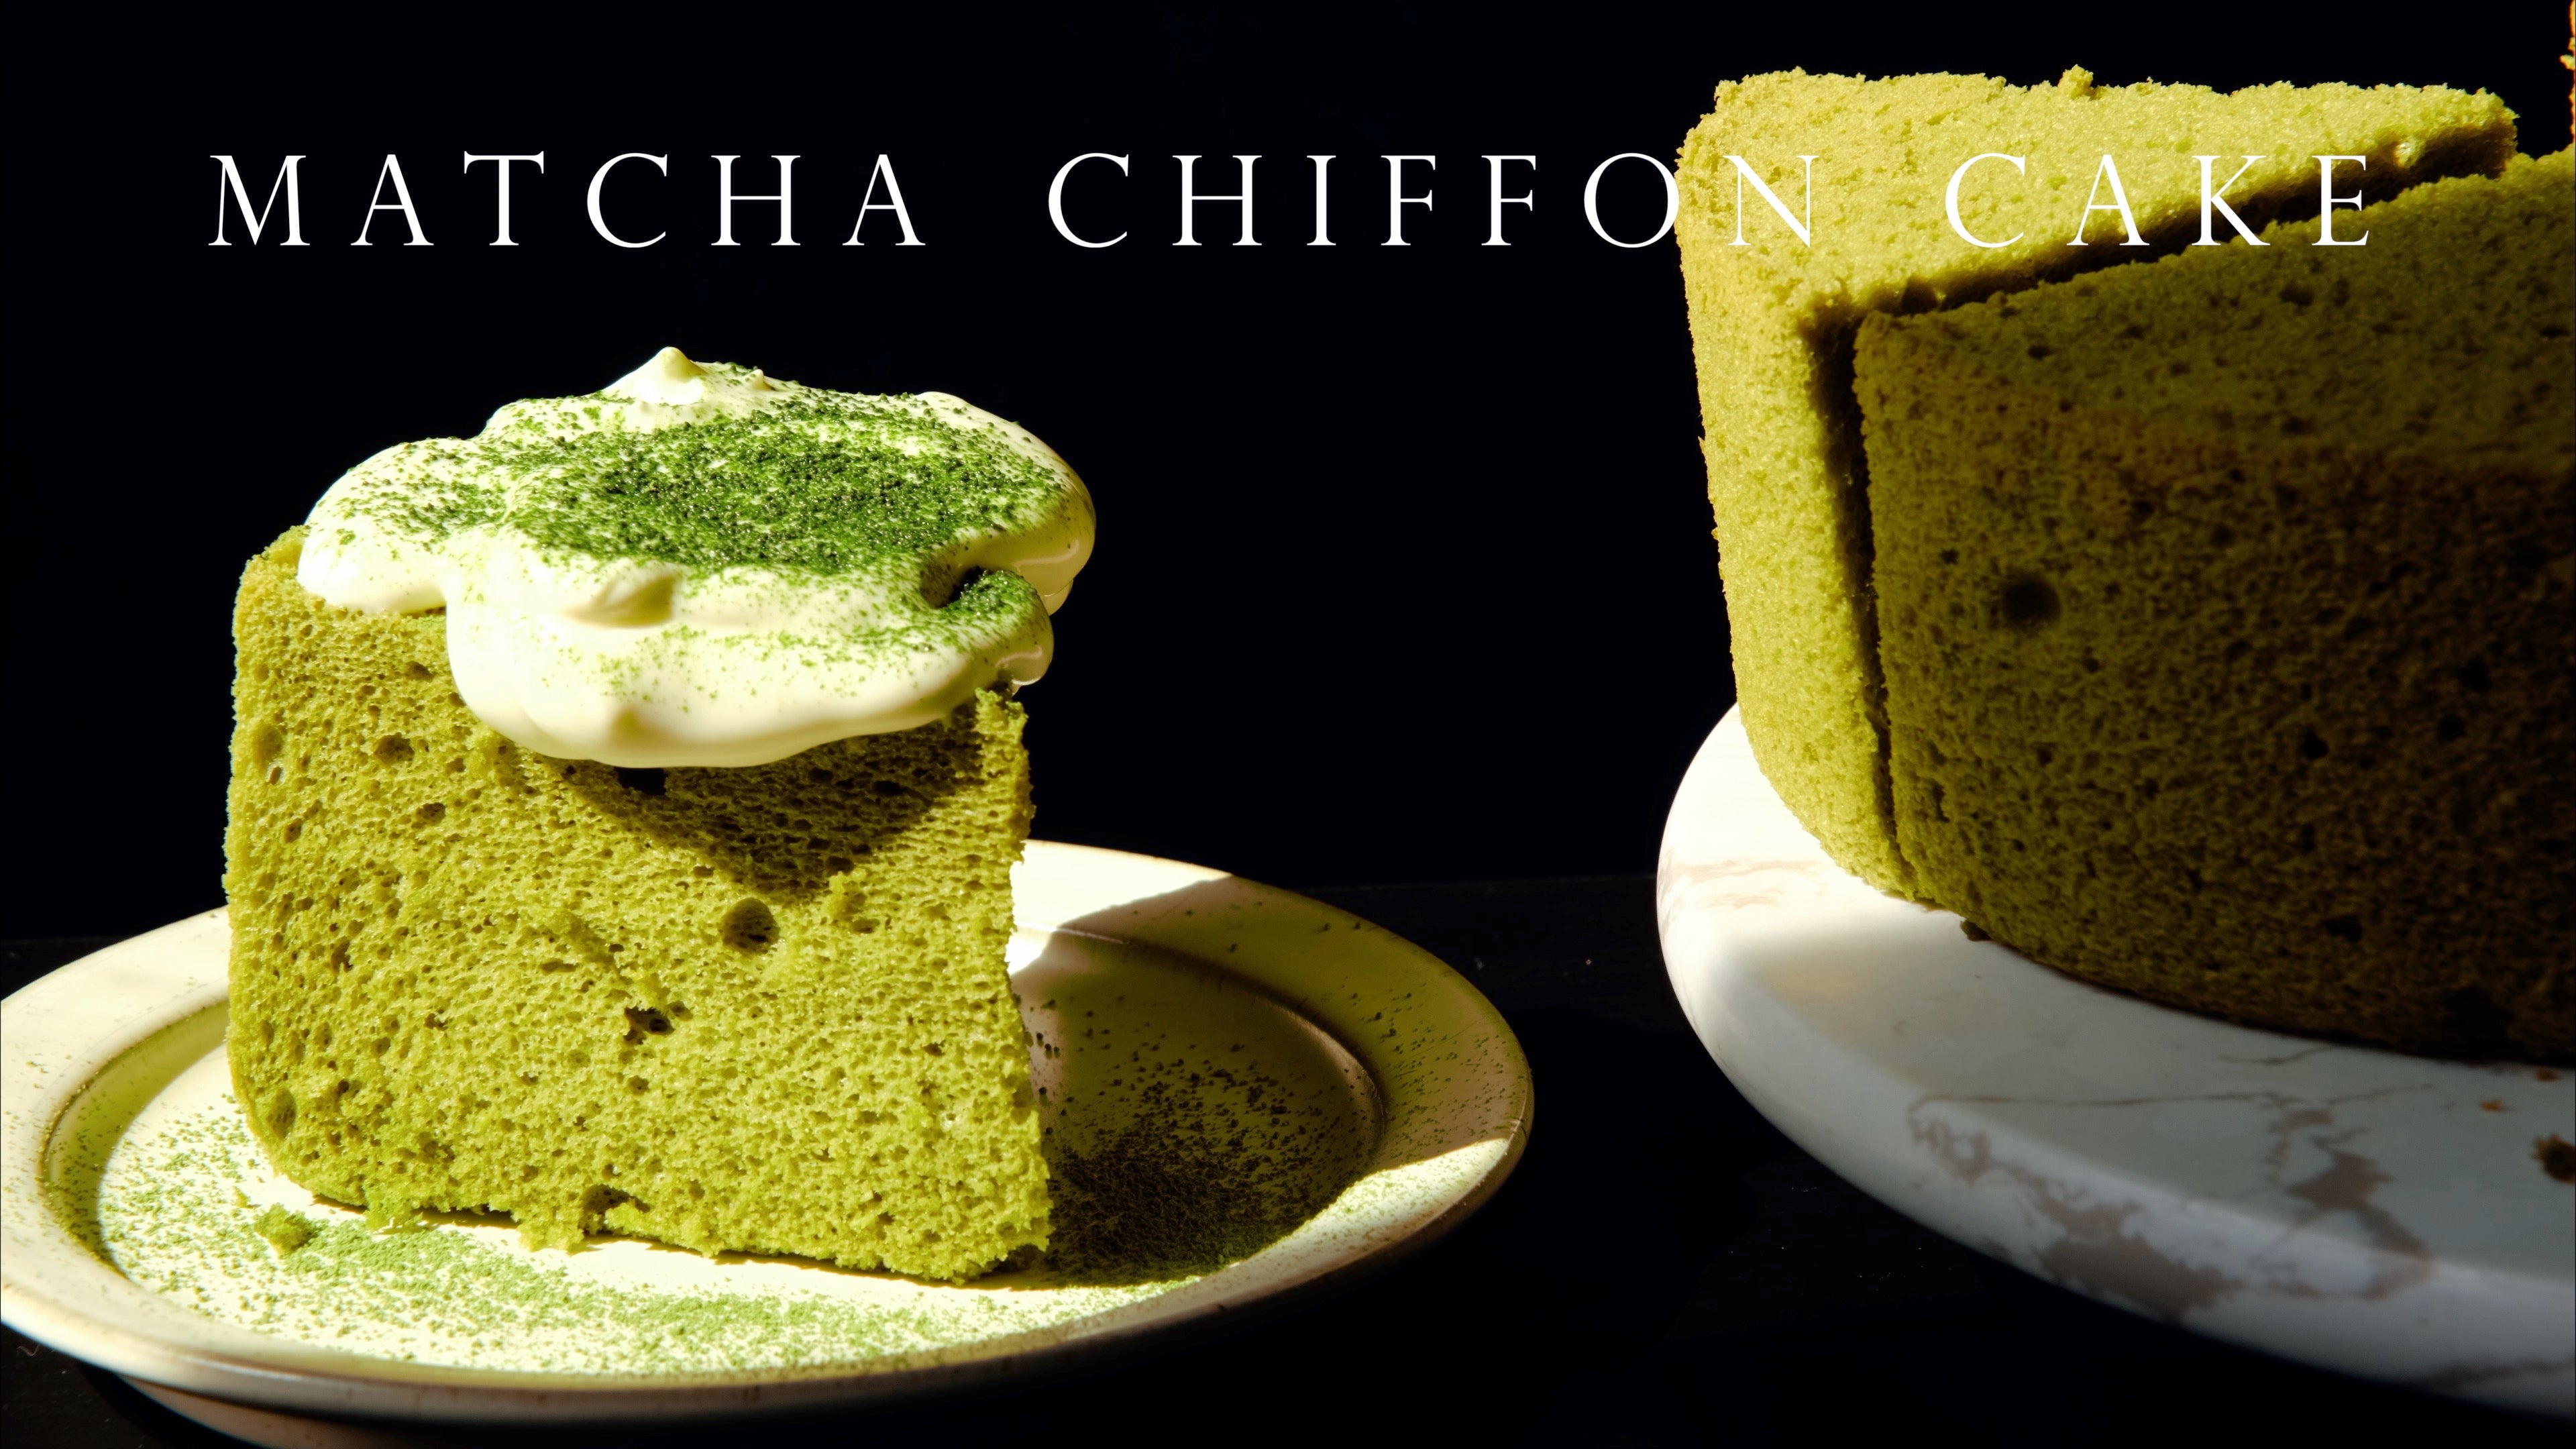
Fluffy Matcha Chiffon Cake – Light & Airy Japanese Dessert

Table of Contents
Matcha Chiffon Cake
INGREDIENTS
INSTRUCTIONS
Why this this matcha chiffon cake stays green
-
No milk in the batter: Dairy proteins + lactose speed up browning and mute green tones. Skipping milk keeps the color cleaner.
-
Oil-first dispersion: Rubbing matcha with oil coats the particles so they disperse smoothly and don’t clump or streak. It also reduces direct contact with water at high heat, helping the color look richer.
-
Hot (not boiling) water: ~80°C hot water opens up aroma and color without scorching or turning the hue dull.
-
Low temperature, longer bake: Lower heat = less surface browning, so the crumb stays visibly green.
I absolutely love chiffon cakes for their light-as-air texture, and this Matcha Chiffon Cake is one of my favorites. It’s a delicate, fluffy cake infused with earthy matcha (green tea) flavor. This 6-inch version is perfect for a small gathering or intimate dessert. Traditionally, chiffon cakes are made in a tube pan, but here I use a regular 6-inch round cake pan (no center tube) with great success – it still comes out tall, springy, and delicious. To balance the rich tea taste (since there’s no milk in the batter), I finish the cake with a luscious whipped cream topping that drips like a “milk cap” and a dusting of matcha. It’s like enjoying a creamy matcha latte in cake form! In this post, I’ll share step-by-step how to make it, tips for success, FAQs, and even how to adjust the recipe for different pan sizes. Let’s get started!
About the Matcha Powder I Use
The matcha powder you choose makes a huge difference in both flavor and color. For this recipe, I use Morihan Uji Matcha (森半宇治抹茶). It has a vibrant green hue and a deep, slightly sweet umami flavor that really shines in chiffon cakes. Lower-grade matcha can result in a dull brownish color after baking, so if you want that beautiful green crumb, invest in a good quality Japanese matcha.
https://kit.co/molalacook/ingredients/morihan-premium-orga
Instructions
-
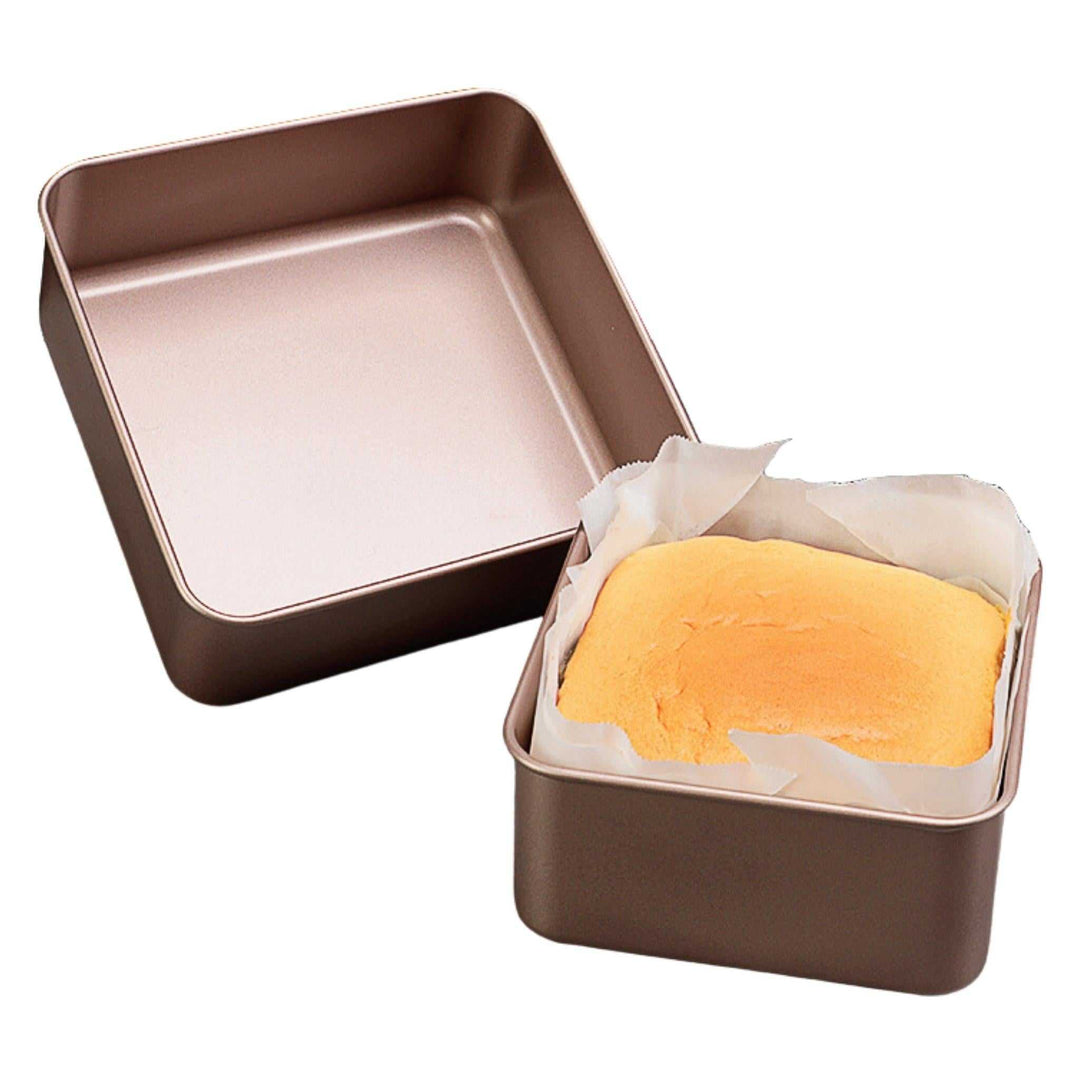
Preheat & Prep Pan: Preheat your oven to 140°C (284°F). Do not grease a 6-inch cake pan (chiffon cakes need an ungreased surface to climb). If using a pan with a removable bottom, you can line the bottom with parchment paper for easy release, but leave the sides unlined and ungreased.

-
Mix Matcha and Oil: In a large mixing bowl, add the matcha powder and corn oil. Stir them together until the matcha is dissolved into the oil and forms a smooth, deep green paste. Mixing matcha with oil first helps prevent clumps and brings out the aroma of the tea.
-
Add Hot Water: Pour in the hot water (around 80°C/176°F) into the matcha-oil paste. Whisk well until completely combined. The mixture should be smooth and slightly thick, with no dry matcha lumps remaining.
-
Incorporate Flour: Sift the cake flour into the matcha mixture (to avoid lumps) and whisk until just combined. The batter will be a bit thick at this stage, but make sure there are no large pockets of dry flour.
-
Add Egg Yolks: Stir in the 3 egg yolks one at a time, mixing well after each addition. The batter will loosen up and become silky. Mix until you get a smooth, cohesive matcha yolk batter. Set this aside.

-
Make Meringue: In a clean, grease-free bowl, begin beating the 3 egg whites using an electric mixer (or stand mixer with whisk attachment) on medium speed until foamy. Add the lemon juice (or vinegar) – the slight acidity helps stabilize the meringue. Continue beating and gradually add the 55 g of sugar in a slow stream. Increase to high speed and beat until the egg whites form stiff peaks (the peaks stand straight up when you lift the whisk). The meringue should be glossy and smooth. Be careful not to overbeat (which would make it dry/curdled) or underbeat (soft peaks won’t hold enough air).

-
Fold Meringue into Batter: Using a spatula, scoop about 1/3 of the meringue into the matcha yolk batter. Gently fold it in until no streaks remain – this lightens the batter. Now add the remaining meringue in two additions, carefully folding each time with an under-and-over motion. Do not stir vigorously – use gentle folding to avoid deflating the air from the egg whites. Fold just until the batter is evenly colored light green with no white streaks. The final batter should be airy and pourable.

-
Fill the Pan: Pour the batter into your ungreased 6-inch pan. Fill about 3/4 full (this batter is perfect for a 6x3 inch pan). Give the pan a couple of gentle taps on the counter to pop any large air bubbles. You can also run a skewer or knife through the batter in zig-zag to eliminate trapped pockets of air.

-
Bake – Part 1: Place the pan in the preheated oven and bake at 140°C (284°F) for 35 minutes. Try not to open the oven during this time, as the temperature drop or jarring movement could cause the delicate cake to collapse.
-
Bake – Part 2: After 35 minutes, without opening the oven door, reduce the temperature to 130°C (266°F). Continue baking for another 10–15 minutes. This low-and-slow baking helps the cake cook through gently and prevents the top from cracking or over-browning. The cake is done when the top is springy and a skewer inserted into the center comes out clean (or with just a couple of dry crumbs). If it’s still a bit wet, bake a few more minutes. (Oven temperatures can vary, so keep an eye on it. If you notice the top getting too brown at any point, you can loosely tent it with foil.)
-
Invert and Cool: Immediately after removing the cake from the oven, invert the pan upside down to cool. Cooling chiffon cake upside down is critical – it keeps the cake from collapsing as it sets. If you used a tube pan with legs, just flip it onto its legs. For a regular pan, invert it over a stable cooling rack or prop the pan up on the edges of some mugs or a bottle. Let the cake cool completely while upside down (at least 1 hour). This ensures it sets at maximum height and stays ultra-fluffy.
-
Release the Cake: Once completely cool, turn the pan upright and carefully run a thin knife or offset spatula around the edges of the cake to loosen it. If your pan has a removable bottom, push the cake out gently. Then run a knife along the bottom to release the base. Be patient and gentle to avoid tearing the cake’s tender sides. Transfer the chiffon cake to a serving plate.
-
Whip the Cream Topping: In a bowl, combine the cold heavy whipping cream and 10 g of sugar. Using a mixer or whisk, whip the cream until it just thickens to a soft peak stage. We don’t want stiff whipped cream here; aim for a pourable, velvety consistency (like the texture of a thick milkshake or “cheese foam” topping). It should be thickened enough to coat the back of a spoon but still flow in ribbons.

-
Pour and Garnish: Slowly pour the lightly whipped cream over the top of the cooled chiffon cake. It will gently spread and may drip a little over the sides like a glaze – this is what we want. Smooth it lightly with a spoon if needed. Finally, dust a pinch of matcha powder on top for a beautiful finishing touch. Now slice your gorgeous matcha chiffon cake and enjoy! Each bite is light, airy, and fragrant, with the sweet cream balancing the bold green tea flavor.

Tips for Success
-
Use the Right Pan (and Don’t Grease it): Chiffon cakes rise by clinging to the sides of the pan. Use an aluminum pan with straight sides. Do not grease or flour the pan. If you’re using a non-tube round pan, only line the bottom with parchment (if it’s not removable) and leave the sides bare. An ungreased, non-nonstick surface is key; if the cake can’t grip the sides, it may not rise well and could collapse when coolingallthatmatters2rei.blogspot.com. Also, avoid non-stick pans for chiffons – the slick surface makes the cake slide down as it tries to rise.
-
Room-Temperature Eggs: Make sure your egg whites and yolks are at room temp before starting. Room-temp eggs whip up to a greater volume, giving you more airy meringue and a higher cake. If your eggs are cold, you can sit them in warm water for 5-10 minutes to warm up.
-
Mix Matcha with Oil First: As we did in this recipe, mixing the matcha powder with oil creates a smooth paste and prevents clumps. This method ensures the matcha flavor is evenly distributed in the batter. If you simply added matcha directly to liquids, it might not dissolve well. So don’t skip that step – it makes a difference in color and taste intensity!
-
Beat Egg Whites to Stiff Peaks: Properly whipped meringue is the backbone of a chiffon’s structure. You want stiff peaks that are glossy and stand straight. Under-whipped whites (soft peaks) can cause the cake to collapse due to lack of structure, while over-whipped whites will be grainy and collapse more easily when folding. If you’re not confident, it’s better to stop just at stiff peaks. You can recognize stiff peaks when the tips of the meringue hold upright without drooping, and the foam looks smooth and dense. A pinch of acid (lemon juice or cream of tartar) helps keep the meringue stable.
-
Folding Gently is Crucial: Always fold in the meringue by hand using a gentle “J” motion or cutting/folding action. Do not beat or stir vigorously. A light hand will preserve the air bubbles you created. It’s okay if a few small lumps of batter remain – over-mixing is more harmful as it deflates the batter. Mix just until you no longer see obvious streaks of egg white.
-
Bake Low and Slow (if Needed): Chiffon cakes often do well baked at moderate temperatures (150–160°C). Our method of starting at 140°C then reducing further was to accommodate a solid round pan and prevent over-browning. Every oven is different, so if you find your chiffons often crack or brown too fast, try lowering the temperature by 10-20°C and extending the bake time a bit. A evenly baked light golden cake is ideal.
-
Avoid Sudden Changes: Don’t open the oven door in the first 30 minutes of baking, and avoid big temperature swings or vibrations. The delicate structure is still setting and can collapse if disturbed. Once the bake is near completion, you can gently check for doneness but handle with care.
-
Invert Immediately: When the cake comes out of the oven, turn it upside down without hesitation. Gravity is not your friend for a hot chiffon – inverted cooling ensures it doesn’t shrink or sink. Use the neck of a wine bottle or a stable can if you have a tube pan with no legs. If using a regular pan, balance it on a wire rack or similar support.
For example, I like to use a special chiffon cake cooling rack designed for this purpose. This handy rack (suitable for 4–8 inch cakes) has prongs that securely hold the pan upside down, allowing the cake to hang freely as it cools. It’s made of sturdy, heat-resistant materials so you can invert your cake straight from the oven. Using a dedicated rack makes cooling foolproof – no balancing acts or worries about the cake dropping out. If you don’t have one, improvise by propping the inverted pan on a bottle or four upside-down mugs at the pan’s rim. Just make sure the cake has airflow and isn’t sealed off on a flat surface.
-
Patience Before Slicing: Ensure the cake is completely cool before removing from the pan and slicing. Removing too early can cause it to tear or collapse because the structure hasn’t set. Once cool, use a thin blade to loosen the edges. Chiffon cakes are best cut with a serrated knife in a gentle sawing motion to avoid squishing their airy texture.
-
Serving and Storing: This matcha chiffon is wonderful on its own, but the lightly sweet whipped cream on top really elevates it. The cream will slowly soak in if stored, so it’s best to add it right before serving. If you have leftovers, store them in an airtight container. Without cream, the cake stays soft at room temperature (covered) for 1-2 days. If it’s topped with cream or if you live in a warm climate, refrigerate it – it will keep about 3 days chilled (just know refrigerated chiffon can firm up a bit; let slices come to room temp before eating for the best soft texture).
FAQ
Q: My chiffon cake collapsed or shrank after baking – what did I do wrong?
A: A slight shrink (pulling away from the sides) is normal as the cake cools, but a major collapse usually points to a problem in the process. Here are a few common culprits:
-
Under-baking: If the cake wasn’t baked long enough or at a high enough temperature, the interior might have been undercooked and not stable. Always test with a skewer; it should come out clean. An under-baked chiffon will collapse as it cools because the structure isn’t fully set.
-
Over or under-beaten egg whites: If the meringue was under-beaten (too soft) or over-beaten (dry and broken), it can’t hold the air. Proper stiff peaks are key. Over-beaten whites can also fail because they can’t expand in the oven – they’ll collapse and weep liquid.
-
Deflating the batter: Rough mixing or folding can knock out too much air. Fold gently and don’t take too long to incorporate the whites into the batter. Work quickly but carefully.
-
Greased or non-stick pan: If the cake can’t cling to climb, it won’t rise well and may fall. Make sure your pan is ungreased and not non-stick.
-
Cooling improperly: Not inverting the cake or moving it while it’s hot can cause it to fall under its own weight. Always cool it upside down undisturbed.
-
Sudden temperature changes: Drastic changes (like opening the oven too early or a cold draft) can make the delicate foam collapse. Bake until done and avoid moving the cake around until it’s set.
By reviewing each step, you can usually pinpoint the issue. Chiffon cakes can be a bit finicky, but once you nail the technique, they’ll consistently turn out tall and springy.
Q: How should I store this matcha chiffon cake, and can I make it ahead?
A: Chiffon cakes are best enjoyed fresh, on the day they’re baked, because they’re so moist and airy. However, you can definitely store it if needed. If you plan to serve it later, it’s actually best to leave it plain (without the whipped cream) until shortly before serving. Wrap the cooled cake (whole or slices) in plastic wrap or keep it in an airtight container. It can stay at room temperature for about 1-2 days just fine (since there’s no butter, it won’t harden – in fact chiffon cakes often taste even more moist the next day). If you’ve added the whipped cream or if it’s particularly warm in your kitchen, store the cake in the refrigerator to keep the dairy fresh. In the fridge it will last about 3 days. Keep in mind refrigerated chiffon can become a bit firmer; you can let slices sit out for 15 minutes to soften slightly. For longer storage, you could even freeze the bare cake (tightly wrapped) for up to a month, then thaw at room temp – but without any topping. Add fresh whipped cream topping after thawing, right before serving. Overall, if making ahead, I’d bake the cake a day in advance at most, and whip the cream topping the day of serving for the best texture.
I hope you enjoy this delightful Matcha Chiffon Cake as much as I do! It’s a bit of a labor of love, but the end result is so worth it – a beautiful green-tea flavored cloud of a cake. If you have any more questions or need tips, feel free to reach out or leave a comment. Happy baking!
P.S. – You can find many of the baking tools I use (including the chiffon cake pan and cooling rack) on my shop and also on my kit page (kit.co/molalacook for a curated list of my baking essentials). If you love this recipe and want to support my work, you can buy me a coffee on Ko-fi (molalacook) – your support helps me keep creating new recipes and content. Thank you so much, and happy baking!
Frequently Asked Questions


코멘트를 남겨주세요