

Basque Burnt Cheesecake Toast Recipe

Table of Contents
Basque Burnt Cheesecake Lava Toast
INGREDIENTS
INSTRUCTIONS
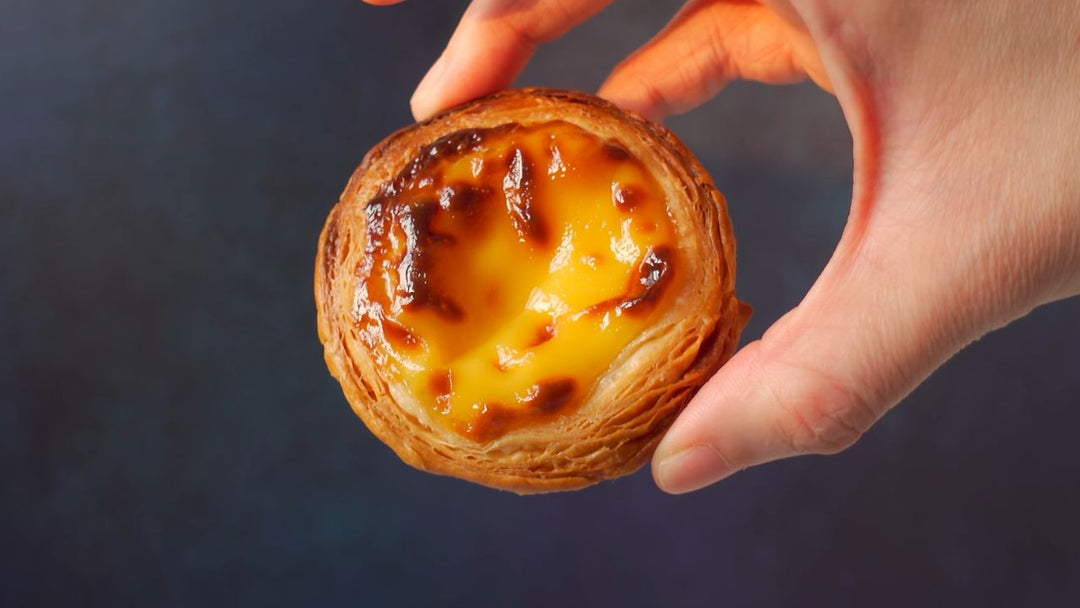
Basque Burnt Cheesecake Toast – Crispy Outside, Molten Inside
Have you ever imagined combining the creamy goodness of a cheesecake with the comforting crunch of toast? Basque Burnt Cheesecake Toast is exactly that dream come true! This delightful treat transforms a thick slice of bread into a mini Basque cheesecake with crispy, caramelized edges and a gooey molten center. It’s a personal-sized twist on the famous Basque “burnt” cheesecake, which has taken the world by storm in recent years (it was even named 2021’s Flavor of the Year by the New York Times. Lately, this toast version has been trending on social media as an easy indulgence for brunch or dessert, and after trying it myself, I can totally see why!
In traditional Basque cheesecake fashion, we bake the toast at a high temperature to achieve that signature scorched top while keeping the inside lusciously creamy. The result? A toast that’s crispy on the outside, and silky-smooth on the inside – absolutely addictive. I first learned this technique from a baker, and I’ve embedded my YouTube video below so you can follow along with the process step by step. Get ready to impress yourself (and everyone else) with this incredibly simple yet fancy-looking treat!
Ingredients (1 Serving)
Here’s what you’ll need for one Basque Burnt Cheesecake Toast (one thick toast slice). Feel free to multiply the ingredients to make more servings:
- 1 thick slice of bread (about 4 cm thick). Ideally use a sturdy bread like brioche or milk bread. This will be our “crust”.
- Cream cheese – 120 g, softened at room temperature.
- Sugar – 25 g (about 2 tablespoons).
- Whole egg – 40 g (lightly beaten; this is roughly 2½ tablespoons of beaten egg, or about ¾ of a typical large egg).
- Whipping cream – 60 g (about ¼ cup heavy cream).
- Corn starch – 4 g (about 1 teaspoon; helps thicken the cheesecake filling).
Note: All ingredients are measured by weight for accuracy. If you don’t have a kitchen scale, you can estimate with the provided volume equivalents. It’s best to have the cream cheese and egg at room temperature for a smoother batter with no lumps.
🛒 Want to see the kitchen tools, appliances, and ingredients I use often?
I've shared my favorite picks on my Kit.co page, where you can browse my Amazon lists and recommendations!
Instructions: How to Make Basque Burnt Cheesecake Toast
-
Preheat the oven: Preheat your oven to 230°C (446°F). This high heat is key to achieving the “burnt” top and creamy center. If your oven has a fan/convection setting, you can use it for more even browning (you might reduce the temp to ~220°C if using convection to prevent over-charring).
-
Prepare the bread base: Take your 4 cm-thick bread slice and gently flatten the center of the bread to create a shallow well, while keeping the crust edges uncompressed. You can do this by pressing down the middle with your fingers or the bottom of a glass. The crusty border will act like a “wall” to hold in the cheesecake filling. Be careful not to tear through the bread – we just want an indentation, not a hole.

-
Make the cheesecake filling: In a mixing bowl, combine the softened cream cheese and sugar. Use a spoon or whisk to beat them together until smooth (no big lumps of cream cheese should remain). Next, add in the beaten egg and whisk until fully incorporated. Then pour in the whipping cream and mix until you get a smooth, creamy batter. Finally, sift in the corn starch and stir well to combine. The mixture should be fairly thick and silky. (It’s okay if there are a few small lumps – they will mostly melt during baking.)

-
Fill the bread: Place the flattened bread slice on a baking sheet (you can line it with parchment or foil for easy cleanup). Carefully pour or spoon the cheesecake batter into the well you created in the bread. Fill it almost to the top of the bread’s rim, but not overflowing. Smooth the top of the filling gently with a spoon. Optional: If you want an extra caramelized top, you can sprinkle a pinch of sugar evenly over the surface of the filling (this helps create a brulee-like effect as it bakes).

-
Bake: Put the baking sheet with the filled toast into the preheated oven. Bake at 230°C (446°F) for about 13–14 minutes, or until the top of the cheesecake filling is deeply browned (even blackened in spots) and the edges of the bread are toasted. The cheesecake center should still jiggle slightly if you nudge the pan – that’s perfect. **Do not overbake**, as we want that gooey, lava-like interior.

-
Cool slightly and enjoy: Remove the Basque cheesecake toast from the oven. Let it cool on the tray for about 2–3 minutes (it will be very hot and the filling will continue to set a bit during this time). The top will deflate slightly – that’s normal. It’s best enjoyed warm while the center is soft and molten. Carefully transfer the toast to a plate (a spatula helps), slice or just bite in, and enjoy your creation!

Safety tip: The filling will be extremely hot right out of the oven (like molten cheese), so do let it cool those few minutes. You don’t want to burn your tongue on the “burnt” cheesecake!
Tips for the Best Basque Cheesecake Toast
-
Use the right bread: A thick, sturdy bread is important. Soft, fluffy bread (like Japanese milk bread or brioche) works great because it flattens easily and has a neutral flavor that complements the sweet filling. Avoid very airy bread or thin slices, as they might get soggy or won’t hold the filling well.
-
Room temperature ingredients: Ensure your cream cheese is softened and egg is at room temp before mixing. This helps everything blend smoothly without lumps. Cold cream cheese can lead to a chunky batter.
-
Baking time and temp: Every oven is a bit different. 13–14 minutes at 230°C is a guideline for a nicely burnt top and gooey middle. Keep an eye on it starting around 12 minutes. The top should look dark brown (even nearly black in spots, like a crème brûlée) and might puff up a little. If by 14 minutes it’s not as browned as you’d like, you can switch to the broil setting for the last 30 seconds to 1 minute – but watch closely to avoid actual burning or smoke. If it’s browning too quickly, you can lower the oven rack or reduce heat slightly next time.
-
Toppings and serve suggestions: The Basque cheesecake toast is wonderful on its own, but you can dress it up if you like. Some ideas: dust a little powdered sugar on top, add fresh berries or a drizzle of berry sauce for color, or a light drizzle of honey or caramel over the top. Just remember the star is that burnt cheesecake flavor, so you don’t want to mask it completely.
-
Making multiple toasts: If you want to bake two or more at once, make sure to leave some space between the bread slices on the baking tray so heat can circulate. The baking time should remain roughly the same. It’s a fun idea for a brunch party – each person gets their own mini cheesecake slice!
Serving and Storage
This treat is absolutely best when it’s fresh and warm from the oven. The contrast of the crisp toast and the warm, creamy center is heavenly. I recommend serving the Basque burnt cheesecake toast immediately after the brief cooling period. It’s a perfect afternoon snack with a cup of coffee or tea, or a lovely dessert to cap off a meal.
If you do have leftovers or need to make it in advance, let the toast cool to room temperature, then cover and refrigerate. Note that as it cools fully, the cheesecake filling will set more firmly (losing the gooey lava quality, but it will still taste good – more like a soft cheesecake). You can enjoy a refrigerated cheesecake toast chilled (the texture will be creamy-fudgy), or warm it up slightly in a toaster oven at a low temperature for a few minutes. Warming it won’t fully bring back the lava center, but will soften the texture a bit. I don’t recommend microwaving (the bread can turn chewy).
Because it’s so easy, it’s best to bake it right before serving for the full experience. If you’re making multiple for guests, you can have everything mixed and the bread prepared in advance, then just assemble and bake when ready to serve. Your guests will be wowed by the dramatic appearance and the fact that there’s cheesecake on toast!
Why We Love Basque Burnt Cheesecake Toast
This recipe has quickly become one of my favorites, and here’s why:
- Quick and Easy: It takes only about 20 minutes from start to finish, no water bath, no crust making, and minimal cleanup – but you still get that authentic Basque cheesecake vibe.
- Single-serving goodness: Great for when you crave cheesecake but don’t want to bake a whole cake. This toast gives you a perfect portion for one (or double it to share with a friend!).
- Texture heaven: You get multiple textures in each bite – the slight crunch of the toasted bread edges, the crackly “burnt” top, and the ultra-creamy center. It’s like a symphony of mouthfeel.
- Versatile serving: Enjoy it for a decadent breakfast, brunch, or as dessert. You can even pair it with ice cream (imagine a scoop of vanilla ice cream melting over the warm cheesecake toast – yum!).
I hope you give this Basque burnt cheesecake toast a try – it truly is a fun and delicious twist on traditional cheesecake that’s worth experiencing. It’s amazing how something so simple can taste so elegant and rich.
If you do try it, let me know in the comments how it turned out or if you added your own spin to it. Happy baking, and enjoy your lava cheesecake on toast!
P.S. If you’re curious about how I film my recipe videos or the gear I use in the kitchen, you can check out my filming gear setup. (This is the kit of camera, lighting, and kitchen equipment that helps me capture these yummy recipes on video!)
Frequently Asked Questions


Leave a comment